Tuesday, August 9, 2011

The chest of drawers

Since we have moved in, our Master bedroom has remained unchanged. Sure we have a beautiful headboard and a few pieces of furniture, but the room is unfinished. One of the pieces of furniture that we do have is a antique chest of drawers which I had been using. However I had envisioned this high and narrow chest of drawers placed on Neil's side of the room between the two windows and on my side a nice low and long chest of drawers. I hadn`t really done much searching, but I knew I wanted......


....something like this.

And wouldn`t you know my sister moves into a new place and hiding, unused in her basement is a chest of drawers just like it. Well I was ecstatic. Here was the chest of drawers I had been coveting free for the taking.


So I brought it home and got to cleaning it. For you see it used to belong in a little girls room....a little girl who seemed to like colouring and putting stickers on her chest of drawers. So I scrubbed and sprayed it with water and hoped for the best. The best was not meant to be as it turns out the drawers were not made of real wood, but presswood. The water absorbed right into the drawers and warped them all.


Still I didn`t want to give up, and even though the drawers were all wonky, the stickers didn`t come off, and the paint was starting to look bubbly, I felt that I could still make it work.


However after hauling it upstairs to our room and spending an evening lying beside it we realised that we had another problem.....it stank. I guess 10 years hiding in a damp and mildewy basement takes its toll, because no matter how much more I cleaned, or how much febreeze I sprayed, it still stunk.
So I decided to cut my losses (I mean it was free to begin with). I took off all the pulls, because I have something creative in mind for a replacement bureau and threw the smelly thing out the door. Literally.


So although my attempt at reusing the old bureau went up in smoke....literally. I hope to one day show you a beautiful bureau in our master bedroom. Meanwhile I am busy spray panting the old chest of drawers we already had white so Neil can move his clothes into it. And for now my clothes have found a very, very temporary home in our laundry hampers.


Wednesday, May 25, 2011

A Window Progress


So as you know I have a bay window in my house. My childhood dream come true.
However my dream consisted of my bay window having a window seat built in, and until this week this part of my dream was unrealised.

My father having a lull in his work and seeing that the sun was finally shining after two plus weeks of rain, was able to start finishing my bay window.

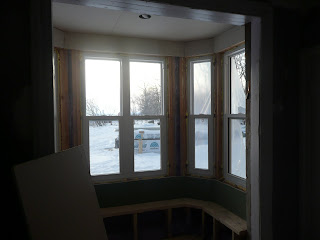
Here is what the bay window looked like before:


Here is inspiration photo of how I envisioned my bay window would someday look like:


And here is what it looks like now:


Still not finished, but closer to my dream then ever before!
And my daughter loves sitting in HER new bench.

Thursday, May 12, 2011

Ethan Thomas

I am happy to announce the arrival of my son.....

                                                      Ethan Thomas.


Born April 14th, 2011 at 5:02 am. Weighing in at 10 pounds and measuring a whopping 21.5 inches.
My big boy is doing wonderful and the whole family is in heaven.

And you know what this means...a whole new room to decorate with a boy in mind. My brain is already planning away Ethan's future room.

Monday, March 28, 2011

Drawing a floor plan

Unit One of my Interior Design course has finally made it's way back into my hands with rave reviews. I am happy to announce that I received an A- for my first unit. While I would have preferred a higher mark my teacher was quick to point out that the mark for the first unit is usually the lowest. So things should be looking up the next time around.

Speaking of which Unit Two of my course has finally arrived in the mail and I have been busy working my way through it.  I have completed all the lessons and have now started on the project for this unit, drawing a floor plan for my previously sketched living room and sketching and drawing a floor plan for a bedroom.
Along with the lessons I also received 5 interior design books, a drafting tablet, pencils, t-rule, an eraser and brush, sharpener, door template and rulers. I am slowly feeling more and more professional as we go on.

Here is the break down of what Unit Two has taught me.

Lesson one got right to the heart of the matter and went through the process of how to draw a finished floor plan. We practised on a fictional room and then as our final project we had to draw a finished floor plan for both a bedroom and a living room. The work I have done in the first two units is accumalative and I will continue to adapt and add on to these rooms, as well as start work on new rooms.
Lesson two focused on two key issues of design, furniture selection and colour scale. the first half of the lesson went over the guidelines for what to look for in furniture, where to buy it and how to know if it suits a particular room. The second half of the lesson got me painting up a storm as I learned how to vary the value and intensity of colours.
Lesson three delved into period furniture, and the first period we looked at was Early American Farmhouse Style. Which turns out to be the style I am mist particularly drawn to. We had a mini test after this lesson in which we had to select all the American Farmhouse furniture out of a drawing of twenty different furniture styles.
Lesson four was on the business side of things and had us looking over how to write up a Letter of Agreement with our clients. This section of the course really makes it clear that what I might now consider a hobby could potential be a future career.

I look forward to receiving feedback on my work and getting started on the next unit. However with a baby due any day now I am not sure how much time I will have to devote to my studies. I am just happy I am off to a good start and that I am truly enjoying the work.

Shopping

My hubby and I have been out shopping, and not of the window shopping variety, but real purchases and all.
We have decided to tackle one room at a time in our home and the first on the list is the mudroom.
So as not to get sidetracked by the arrival of our new baby in two weeks time we decided to go get a few of the most have essentials needed to finish of the room.

1) We ordered the two closet doors from Dimension doors. Instead of the standard bi-fold closet doors we wanted a more custom look and we thought that two small solid wood doors would give the mudroom the character it needed. Also the doors match the rest of the doors in our house. We plan on painting them red, actually Orchard red from Sarah Richardson's PARA paint line.

However they do not carry her colours here in the good ol' province of Qc. So we are having Benjamin Moore match it for us.

2) Speaking of Benjamin Moore, the local retailer here also sells Robert Allen fabric and I am very happy to announce that we have ordered the fabric for the mudroom.


In two weeks time we should be receiving this Paisely Flower fabric in Date, and although it is expensive I really think that the wow factor of this fabric is worth it. Especially since the mudroom will be the introduction to the rest of our house.

3) Deciding that the plain pine paneling was a bit too much wood we decided to buy a white stain to try out on the lower portion of the wall. While I wasn't happy with the pine being plain I also felt that painting it would ruin the country charm of the paneling. So we opted to try staining the wood white, this way we still see the knots and grain of the pine. We will know for sure if it was the right move once everything is in place.
4) We found ourselves a perfect little bench to fit nicely in the mudroom. We didn't have a lot of space to work with, 43'x18' to be exact, and this little fellow just made the cut. We plan on painting it, but want to wait and see the fabric and red doors in place before choosing a colour.

5) This next purchase applies to the whole house, although we will be using it in the mudroom as well.
DOORKNOBS!! I am so excited to finally found doorknobs we like. Here it is in all it's glory, the Weiser Wickham knob in black. 
                                                           
We originally wanted porcelain to go with the country feel of our house, but seeing that the price was out of our reach we went with the black as it gave off the same "old" look we were after. I can not wait to get them installed. It's going to make our place seemed that much more finished.

We still have a few purchases left to make, like the grass cloth wallpaper for the upper portion of wall and closet storage, shelves and hooks.
I love shopping!!

Sunday, March 6, 2011

Window Seats

Now that we are back home the to-do list for our home looms over our heads. I sat down the other day and decided to write down everything we still have left to do in the house. While I know as home owners we will never be truly finished when it comes to our home, we have a few must have things we need to do to make our house a home.

One of this such things is finishing off the bay window. And part of finishing the bay window involves building a window seat. I have always wanted one and felt that the space definitely warranted one. But before we get building I have to know what I want the seat to look like. So for inspiration I hit the web and found a few windows that really caught my attention.


To me this is an ideal window seat. Enough room to sit comfortably and read, but also functional for guests to perch at a party.

I could definitely see myself curled up here for hours with a good book.


Love the bead board. This just might be the perfect inspiration photo for my own window seat.


Such amazing vibrant colours. A window seat is a perfect place to go a bit crazy with fabric.


While at the same time simplicity reigns.

I guess I have a few choices to work with. Now to make a decision and start building. I can't wait to hear the pitter patter of hammers once again.

Sunday, February 20, 2011

Back to School

I came home early. There was a carbon monoxide leak at school and due to the fact that I was 31 weeks pregnant at the time the health professionals in my village didn't want to take any chances. So they quickly flew me down from my Northern village (which I probably will never see again) to Montreal.  It was quite the journey, with a nurse accompanying me the entire way and an ambulance waiting for me at the airport. Luckily both the baby and I are doing great.

So yeah I am home early.
Not what I intended, but it happened and I had to leave hubby and Niamh behind.
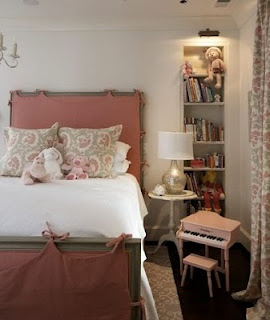
So instead of sulking in bed I decided to get started on my interior design course. I had enrolled with the Sheffield School of Interior Design back in January and most of my course material had arrived at my home down south.


I opened up Unit One and got to work.

Unit One

Unit One has 6 mini lessons in it, all of which are accompanied by a book and a CD recording of two designers discussing the subject at hand. It starts out by explaining the basics of design and how one needs to practise developing the "eye of a designer".
The next lesson is on getting to know your clients. You are set up with a fake couple to interview and get to know them and what they want out of their home.
Lesson three is on how to measure and free-hand sketch a room and the main project for this unit is to find a real living room to practise on. Luckily for me I have a living room so I got out my pink measuring tape and got to work. If I had a scanner I would post a picture of my lovely sketch, but you`ll just have to imagine it for now.
 Lesson four is on the use of colour and I got to go back to my primary days of mixing water colours to make a colour wheel. It was messy but fun.
Lesson five was on how to charge clients for your design ($ fun!) and finally lesson six was on green design.

I completed the unit in record time, but I will not be boastful. After all I am all by myself, with nothing much else to do. Once hubby and Niamh arrive home I will not have as much free time. Throw in a newborn and I hope to remember what design is.
So I will take advantage of my time and get working on this new exciting chapter in my life.
The only thing is......Unit two is still in the mail.

Wednesday, February 16, 2011

Seeing red

After spending some time pouring over the red rooms in my previous post I got to thinking about the second kids room in our house. I was drawn to using the colour red from the get go and thought I might post a few photos that inspire the future decore of this room.

Here is the room as it is now.


I have two hand me down dark stained wood twin beds which I thought I would lay side by side. The 'duvet' covers are Ikea curtains I got for 2$ at a garage sale, and one day I will get out my sewing machien and make them into proper duvets.

I got this side table in the Ikea liquidation section and thought it would work perfectly between the two beds.


However this is as far as I have come in the styling department for this room. Since I am still on the lookout for some fresh and fun red ideas for this room I thought I would share some of the great rooms I found during my search for inspiration.


Thursday, February 10, 2011

The season of love

Happy Valentines Day everyone.
In honour of the day of love I thought I would post some of my favourite room designs featuring the valentine duo; red and pink.


Decorpad

Sarah Richardson


IDS (Sarah Richardson)


Martha Stewart


Decorpad


Unknown


Sarah Richardson


Counry Living


Hope everyone enjoys a bit of bright colour in their lives this time of year. Looking through these pictures makes me want to incorporate more of these colours in my own home.

Saturday, January 29, 2011

Niamh's big girl room

Seeing that we will soon be expecting our second child, Niamh will be taking on the role of a big sister.
Being a big sister comes with lots of responsibilities, like sharing toys, playing nicely, hugging and kissing and handing over her crib.
We still have a few months left until the crib changes hands, but once the exchange happens Niamh will be in need of a new bed.
While we are at it I thought we might as well update her entire room to suit the needs of this big soon to be big girl.
Here are a few inspiring rooms to set us on the right path to changing Niamh's baby room into a big girls room.


An old cast iron bed would look nice in her crooked, squeaky floored room. And I would like to keep things light and airy in her room and this image invokes my vision exactly.


Even a new cast iron bed would do. And I love the idea of having a double bed in there for potential sleep overs or for mommy or daddy to lie down with her at bedtimes. I think the small wallpapered section is so whimsical and wonder if I could make it work in Niamh's room.


Isn't this such a cute room. I love, love this bed which would work great with the old antique armoire we already have in her room. Also the painted floor reminds me very much of what we have to work with in Niamh's room.


The slanted roof is also something we have to work around in Niamh's room. This room shows us how we can be creative with our awkward angles.


My mom gave me a great antique quilt that I could see using on Niamh's bed or have it hanging on the wall as in this room by Sarah Richardson. The whole bed ensemble in this room is great, and while it was designed for adults I can picture it working wonderfully for Niamh now and for many years to come.


Niamh is the princess of the family, and what little princess wouldn't love a pink bedroom. This pink has  a mature, muted tone to it rather then being too cutesy, and just might win over my husband who has expressed extreme dislike for the pink ballerina theme I had started to go with for Niamh's room.


While I am partial to white rooms for kids, as you don't have to paint it out every time their favourite colour changes, the combination of these bright colours works really well. Maybe a little more colour wouldn't be so bad. The daybed is also another great option for a growing girls room.

The re-design of Niamh's room won't be happening at least until this summer, but at least I have a few jumping off points to get me started on making my little girls big girl room a reality.

Thursday, January 27, 2011

All things baby

All this talk of nurseries has got me obsessing over all the beautiful baby products out there right now.
Being on a tight budget (paying off mortgage and going off on maternity leave make for a nice combo) I can't run out and buy too many new items for this new arrival.
I will have to make due with what we have for now.....which isn't much mind you. We have a basic wood Ikea crib, a change table refurnished out of an old bureau, and an old lazy boy my parents threw out.
But if I could update my baby essentials, these would be my must haves to buy this time around.


 I love this highchair by Stokke. The colour matches my kitchen and it grows with baby to become a toddler chair. 


As you know I love everything Sarah Richardson, and this Zoe glider chair is by far the prettiest one on the block. I almost convinced my husband that we needed to buy it, but then he saw the price tag.
So the old lazy boy it is.

 I love this baby bouncer chair by Oeuf. I wanted it with our first baby and I still want it now, but I must be content with daydreaming about it instead as the Fisher Price one we were given still functions perfectly and I can't justify the splurge.


This Millbrook iron crib and organic bedding from Restoration Hardware is timeless, elegant and classic. It would look wonderful in my old farmhouse and my baby would look so posh sleeping in it. However it is not meant to be, as my mother would say, and baby will look posh no matter where they lay their weary heads.

So while I may have a champagne taste on a beer budget when it comes to all things baby, reality has sunk in that I will never own any of these beautiful items.
Besides the most important thing is that baby and mommy are happy and healthy, and happy and healthy we shall be fancy furniture or not.


Wednesday, January 26, 2011

Nursery

I am expecting my second child in April and with the date fast approaching it seems all that I have on my mind these days is all things baby.
I didn't have a nursery with my first child, nor will I have one with the second as they stay in our room for the first 5 months. I don't feel like decorating a room that will hardly get used, only to redecorate it again when we turn it into a big kids room.
However just because I won't be venturing into the world of nursery decorating I can still window shop.
Here are a few looks that I love and would happily use as inspiration for my own if time and money were not an option.

 A nursery with a very modern look. I can't see myself ever painting my kids room black, but there is something about the clean, starkness of this room that appeals to me. Easily a room that can grow with the child.


 Magical!!! The combination of modern and romantic is great and  just looking at this room makes me happy. And a happy nursery is always a good thing.


 Can't go wrong with a Sarah Richardson design as this nursery proves. The fabrics are breathtaking and what I wouldn't do to get my hands on that glider.


 So simple, so precious, so perfect. Can I have this room please?


I love this ultra-girly room. What little princess wouldn't love waking up in this beautiful room. If this room was in my house I might be the one waking up in it.


Wow fabric and colour overload.....but I love it!! What a great way to use up extra fabric and what a wonderful world to envelope baby in.  Could work for a big kids room too.

Hmm all this nursery talk is really making me want one.......maybe if the mood strikes and I can get creative with what I already have, this little one might just have a room of it's own.
Related Posts Plugin for WordPress, Blogger...